
Last reviewed: September 2026
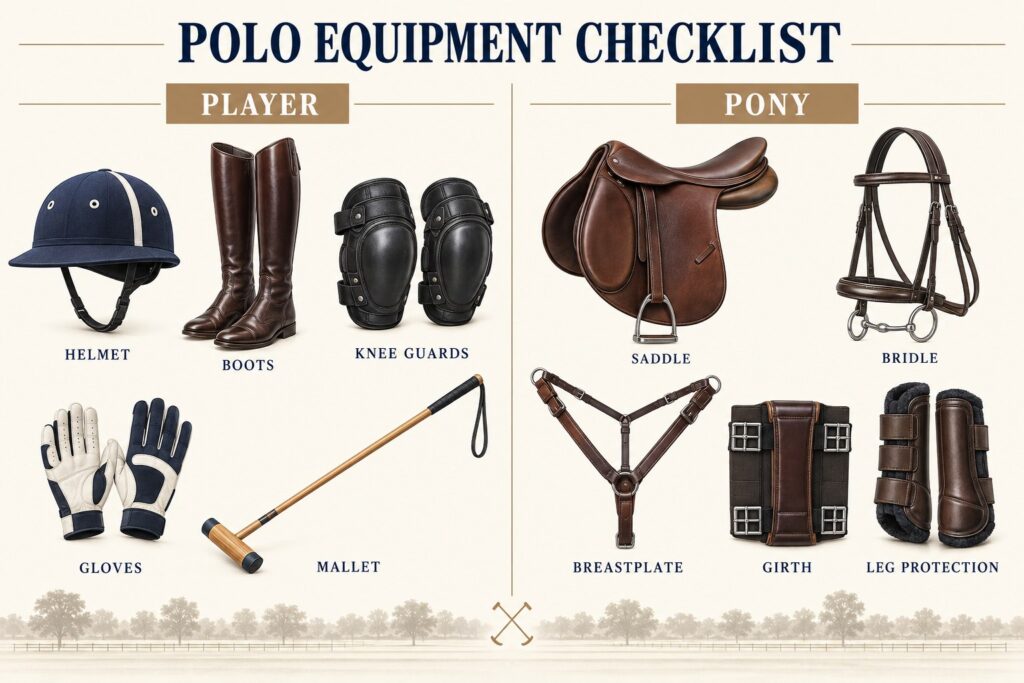
A beginner polo player needs a correctly fitted certified helmet, riding or polo boots with a defined heel, knee guards, gloves, and a polo mallet chosen for the mounted horse-and-rider combination. Most clubs lend a pony, mallet, and some safety equipment for introductory lessons, so ask what is supplied before buying. Pony tack should normally remain the responsibility of the club or horse owner until you lease or own a polo pony.
This complete polo equipment checklist separates player gear from pony tack, identifies what to borrow and what to buy first, and explains how to inspect each item. Requirements differ between clubs, national associations, tournaments, and age groups. Treat this guide as a purchasing and preparation framework, then confirm the current rules and local requirements with your polo club.
Beginner Polo Equipment Checklist: What Do You Need?
The shortest useful answer is that the rider needs personal protective equipment and a suitable mallet, while the pony needs correctly fitted tack and leg protection. The table below gives each item a role and an ownership priority. “Club first” means a beginner should normally use club equipment or the equipment assigned to the pony rather than purchasing without guidance.
| Equipment | Used by | Primary purpose | Beginner priority |
|---|---|---|---|
| Certified polo or equestrian helmet | Player | Head protection | Essential; personal fit preferred |
| Polo or riding boots with a heel | Player | Lower-leg support and safer stirrup use | Essential |
| Knee guards | Player | Protect the knee during close mounted play | Essential for play; confirm club rules |
| Riding gloves | Player | Grip, rein feel, and hand protection | High |
| Polo mallet | Player | Striking the ball | Borrow before buying |
| Eye or face protection | Player | Additional facial and eye protection | Rule- and player-dependent |
| Polo saddle and pad | Pony | Stable rider position and pressure distribution | Club or owner supplied |
| Bridle, bit, and reins | Pony | Communication and control | Club or owner supplied |
| Girth, overgirth, and breastplate | Pony | Help secure and stabilize the saddle | Club or owner supplied |
| Leg wraps or protective boots | Pony | Protect the lower limbs | Club or owner supplied |
Player Equipment vs Polo Pony Tack
Polo equipment is easier to understand when divided by function. Player equipment protects the rider and enables the rider to hold the reins and swing a mallet. Pony tack fits the individual horse and supports communication, saddle stability, comfort, and limb protection. The two groups are related, but they should not be purchased in the same way.
Personal items such as a helmet, boots, gloves, and knee guards must fit the player. A saddle, bridle, bit, breastplate, girth, and leg protection must fit the pony and work together as a complete system. A beginner can own correctly fitted player equipment after professional guidance. Pony tack requires assessment by the horse owner, trainer, saddle fitter, or another qualified professional who knows the horse.
Why This Distinction Matters for Beginners
Buying pony tack before knowing which horse you will ride can waste money and create a welfare risk. A girth that fits one pony may not suit another. A saddle that appears to be the right seat size for the rider can still bridge, rock, pinch, or restrict the horse. A bit is not selected by appearance or severity alone; mouth anatomy, training, rider hands, and the complete bridle arrangement matter.
For a first lesson, the club should allocate the pony and its normal tack. Your job is to arrive in suitable clothing, disclose your experience honestly, and ask which personal protective items are supplied.
Essential Polo Equipment for the Player
1. Certified Polo or Equestrian Helmet
The helmet is the first item to resolve because its protective value depends on certification, fit, condition, and correct fastening. Choose a model accepted by the rules under which you will train or compete. Certification labels differ by market and governing body, and rules can change, so verify the current requirement with the club or association rather than relying on an old product listing.
How a Polo Helmet Should Fit
The helmet should sit level, feel evenly snug around the entire head, and remain stable when you move your head with the harness secured. It should not create a sharp pressure point, rock forward over the eyes, or lift at the back. Hair arrangement changes fit, so test the helmet as it will be worn. Our detailed riding helmet fit guide explains measuring, sizing, movement checks, certification labels, and replacement triggers.
When a Helmet Must Be Replaced
Remove a helmet from use after a significant impact, even if the shell looks normal, and follow the manufacturer’s replacement guidance. Also replace it when the harness, shell, liner, or retention system is damaged; when its history is unknown; or when it no longer fits. Do not buy a used helmet with an unverifiable impact history. In the United States, the SEI certified-products directory can help verify products certified under listed standards.
2. Polo Boots or Suitable Riding Boots
Polo boots protect the lower leg and are designed for demanding mounted work. For a first lesson, a club may allow suitable riding boots, but trainers can set more specific requirements. Footwear should have a defined heel, an appropriate sole, and a shape that does not jam in the stirrup. Fashion boots, trainers, and heavily treaded hiking footwear can create avoidable problems.
Boot Fit and Stirrup Compatibility
The boot should support the foot without crushing the toes or allowing excessive heel lift. Check the width of the boot against the stirrup used by the club; there must be safe clearance rather than a tight wedge. Tall boots should not cut painfully behind the knee when mounted. Break new leather boots in gradually before a long session, and inspect soles, heels, zips, stitching, and closures before riding.
3. Polo Knee Guards
Polo knee guards help protect the knee in a sport where mounted players and tack can come close together. A guard should cover the knee, remain secure when the leg bends, and avoid slipping down or rotating. Straps must be snug without restricting circulation or creating pressure behind the knee.
Try guards while wearing the breeches and boots you intend to use. Walk, squat, and sit in a riding position. A guard that feels acceptable while standing may catch the top of the boot or shift when the knee is flexed. Replace damaged shells, stretched straps, and compressed or separated padding.
4. Riding or Polo Gloves
Gloves improve grip on reins and mallet while reducing rubbing. The correct pair fits close to the hand without bunching in the palm. Fingers should reach the ends without being compressed, and seams should not sit in a place that causes friction. Grip material must still provide feel rather than making the hand rigid.
Because the rein hand and mallet hand perform different tasks, test both. Wet or sweat-soaked gloves can behave differently from dry gloves, so carry a spare pair. Wash and dry them according to the manufacturer’s care instructions.
5. Polo Mallet
A polo mallet must match the mounted geometry of the player and pony. Adult mallets are commonly found in a range around the high 40s to mid-50s in inches, but player height alone does not determine the answer. Horse height, arm and torso proportions, saddle position, stirrup length, technique, mallet weight, balance, head, grip, and shaft response all affect control.
Borrow adjacent lengths and test them under a coach before ordering. The correct mallet lets you address the ball without collapsing the upper body and remains controllable through recovery. Read the complete polo mallet sizing and selection guide for mounted testing, length charts, flex, grip, head, inspection, and storage.
Grip, Sling, and Shaft Check
Before use, confirm that the grip does not rotate, the sling and its attachment are intact, the shaft has no crack or deep dent, and the head is secure. Natural cane terminology is sometimes used loosely: Manau cane is a rattan and is not botanically the same as bamboo. If material matters to the purchase, ask the seller to identify the actual shaft rather than relying on a product name.
6. Eye, Face, and Mouth Protection
Protective eyewear, face guards, and mouthguards may be required or recommended depending on age group, club, event, jurisdiction, and governing rules. Ask the club exactly what is permitted and required. Equipment must be designed for sporting use, remain secure, and not create a new snag or visibility hazard. Prescription-wearers should discuss suitable impact-rated options with an eye-care professional.
7. Polo Clothing
For lessons, clubs often accept fitted riding breeches or jodhpurs, a comfortable shirt, and weather-appropriate layers. Loose scarves, dangling jewelry, unsecured drawcords, and bulky garments can catch on equipment. Competition dress commonly includes team shirts and white trousers or jeans, but the event rules determine the actual requirement.
Choose clothing that allows hip, knee, and shoulder movement. A belt should be secure and not create pressure in the saddle. Socks should be smooth under the boot, and layers should manage heat without obscuring the helmet harness or restricting peripheral vision.
What Tack Does a Polo Pony Need?
A polo pony’s equipment is a connected system, not a shopping list of interchangeable parts. The pony normally needs a polo saddle and pad, girth and often an overgirth, breastplate, bridle, appropriate bit, reins, martingale arrangement where used, and lower-leg protection. Tail preparation and shoeing also require skilled handling. The trainer or owner should decide the exact setup for the horse and the applicable rules.
Polo Saddle and Saddle Pad
The saddle must suit the pony’s back and allow the rider to remain balanced. The pad should be clean, dry, correctly positioned, and compatible with the saddle. No pad can correct a fundamentally unsuitable tree or fit. Check for uneven sweat patterns, dry pressure spots, swelling, heat, tenderness, white hairs, changes in stride, or resistance during saddling. These signs warrant professional assessment rather than an improvised pad change.
Our guide to choosing, fitting, and caring for a saddle explains horse fit, rider fit, leather checks, cleaning, and storage in more detail.
Girth, Overgirth, and Breastplate
The girth secures the saddle, while an overgirth may provide an additional layer of security in polo. A breastplate helps limit excessive saddle movement. These items must be the correct length and adjusted without pinching, rubbing, or restricting the shoulders and breathing. Elastic, stitching, billets, buckles, and attachment points should be checked before mounting and again after warm-up as directed by the groom or trainer.
Bridle, Bit, Reins, and Martingale
The bridle must fit around the ears, poll, cheeks, nose, and mouth without rubbing or interfering with the eyes or breathing. Bit selection is horse-specific. Reins and any martingale arrangement must be correctly fitted and in sound condition. A beginner should never alter the pony’s bit or auxiliary tack without the responsible trainer’s approval.
Polo Wraps and Leg Protection
Polo involves fast turns, acceleration, and close movement, so lower-leg protection is important. Wraps or boots should be clean, appropriately padded, even in tension, and secure. Incorrect wrapping can create pressure points or loosen during work. Learn the club’s method from an experienced groom or trainer and do not practise on a horse unsupervised.
Tail Preparation
Polo ponies commonly have the tail secured so it cannot tangle with the mallet. This must be done by someone who understands safe preparation, circulation, hair tension, and the rules. Remove or adjust the arrangement after play according to the horse-care routine. Never copy a technique from a picture without practical instruction.
What Should a Beginner Borrow and What Should They Buy?
The most economical and accurate approach is staged purchasing. Borrowing is not a sign that you are unprepared; it is how you learn which specifications work before committing money. Confirm availability when booking because loan policies and sizes vary.
| Stage | Borrow or use from club | Consider buying | Decision goal |
|---|---|---|---|
| First lesson | Pony, tack, mallet, and helmet if the club offers a correctly fitted loaner | Suitable trousers, socks, and approved footwear if required | Confirm that polo is suitable and learn club procedures |
| First few lessons | Several mallet lengths; pony-specific tack | Personal helmet, gloves, and boots after fitting | Improve hygiene, consistency, and personal fit |
| Regular training | Pony and tack unless leasing or owning | Knee guards, first mallet, spare gloves, kit bag | Build a dependable player kit from tested specifications |
| Competition preparation | Team or club items as agreed | Rule-compliant spares and required match clothing | Meet the current event rules and manage equipment failure |
| Leasing or ownership | Professional fitting support | Only horse-specific tack approved for that pony | Protect welfare and establish a documented tack system |
Purchase Priority Chart
| Priority | Item | Why it belongs here |
|---|---|---|
| 1 | Helmet | Personal fit and known history are central to protection |
| 2 | Boots | Fit, stirrup compatibility, and repeated comfort matter |
| 3 | Gloves | Low complexity, personal hygiene, and reliable grip |
| 4 | Knee guards | Personal fit becomes important as mounted play develops |
| 5 | Mallet | Buy only after testing length, weight, grip, and response |
| 6 | Pony tack | Purchase only for a known horse with professional input |
Questions to Ask Before Buying
- Which current standards or rules must this item meet?
- Can I test the size with the clothing and equipment I will actually use?
- Does the club allow or recommend this exact design?
- What is the manufacturer’s inspection, cleaning, and replacement guidance?
- Can worn parts be replaced, and are those parts available?
- For tack, who has confirmed fit on the individual pony?
Polo Equipment Fit and Condition Checklist
Fit answers “does this suit the body using it?” Condition answers “is it still structurally sound?” Both must be checked. An expensive item in the wrong size is not an upgrade, and a familiar item can become unsafe through impact, stretching, corrosion, moisture, or wear.
Player Fit Check
- Helmet: level, even pressure, secure harness, no rocking, accepted certification, known history.
- Boots: comfortable toes and heel, sound sole, defined heel, safe stirrup clearance, no failed zip or stitching.
- Knee guards: centered over the knee, secure through flexion, no strap pressure, no rotation.
- Gloves: close fit, full finger movement, no palm bunching, dependable grip when damp.
- Mallet: coach-approved mounted reach, controllable recovery, secure grip and sling, sound shaft and head.
Pony Tack Check
- Saddle: approved for the pony, stable, balanced, adequate clearance, no broken tree or damaged billets.
- Girth system: correct length, clean contact area, sound stitching and buckles, gradual adjustment.
- Bridle: correct adjustment, clear of eyes and breathing structures, supple leather, safe fastenings.
- Reins and attachments: no cracking at stress points, secure stitching, correct stops and connections.
- Leg protection: clean, dry, even, secure, and free from grit or hard edges.
The Two-Minute Pre-Mount Check
Start at the player’s helmet and work down to boots; then inspect the pony from bridle to tail and down each leg. Touch the high-load points rather than looking from a distance. Confirm girth adjustment with the responsible trainer, check that straps are contained, and make sure nothing is twisted. If you cannot explain what a strap does, ask before mounting.
What to Pack for a Polo Lesson, Practice, or Match
A written packing list reduces last-minute improvisation. The club may provide the central playing equipment, but personal comfort and maintenance items remain useful.
First-Lesson Packing List
- Booking confirmation and the club’s clothing or safety instructions
- Approved helmet if not borrowing one
- Suitable boots and fitted trousers
- Gloves if recommended
- Water, sunscreen, and weather-appropriate layers
- Any required medical information and emergency contact details
- A change of shirt and dry socks
Regular-Practice Kit Bag
- Helmet in a protective bag
- Boots, knee guards, gloves, and spares
- Coach-approved mallet or mallets, clearly marked by length
- Clean cloth, soft brush, and manufacturer-approved care items
- Small first-aid supplies for the rider as permitted by the club
- Water and appropriate nutrition
- Phone, emergency contacts, and association or club membership information
Match-Day Additions
Add the required team shirt, whites or specified trousers, spare rule-compliant equipment, and any registration documents. Check the weather and ground conditions, but do not alter protective equipment or pony tack without approval. Review the current USPA rules resources when they govern the event, or use the current rules of the relevant national association.
How to Clean, Store, and Track Polo Equipment
After Every Session
Allow damp equipment to dry naturally in ventilation, away from direct heat. Wipe dirt and sweat from boots, guards, gloves, and mallet grip. The horse’s tack should be cleaned and inspected according to the owner’s system. Do not seal wet leather, fabric, or padding in a closed car or kit bag.
Weekly or Regular Inspection
Check high-stress seams, buckles, billets, elastic, zips, soles, helmet harness components, guard straps, rein connections, mallet sling attachments, shaft surfaces, and the head-to-shaft joint. Look for changes, not only obvious failure. A small split that grows from week to week deserves attention before it becomes a break.
Storage by Equipment Type
- Store the helmet where it cannot be dropped, crushed, or exposed to extreme heat.
- Keep boots upright and dry; use supports if the manufacturer recommends them.
- Store knee guards and gloves clean, dry, and uncompressed.
- Support mallets so shafts are not bent under other equipment.
- Keep leather tack clean, conditioned only as appropriate, covered, and supported in a ventilated tack room.
Create an Equipment Record
Record purchase date, model, size, certification information, impacts, repairs, and replacement guidance for protective equipment. For mallets, record length and the ponies on which each feels suitable. For saddles and tack, document professional assessments and changes in the pony’s condition. A simple record turns memory into traceable maintenance.
Common Beginner Polo Equipment Mistakes
Buying a Complete Kit Before the First Lesson
This creates the highest risk of wrong sizing and unsuitable specifications. Contact the club, use properly maintained loan gear where available, and purchase in stages.
Choosing a Mallet from Player Height Alone
Standing height ignores pony height, arm proportions, saddle position, stirrup length, and technique. Compare adjacent mallet lengths while mounted and have a coach assess posture and recovery.
Using a Helmet Because It “Feels Tight”
Tightness at one pressure point is not correct fit. A helmet should provide even contact and stability in the appropriate head shape. Certification and condition matter as much as size.
Buying Second-Hand Protective Equipment with No History
Hidden impact or material degradation may not be visible. Do not compromise on a helmet’s history. Inspect every used non-helmet item carefully and confirm that replacement parts and adjustment remain sound.
Changing Pony Tack Without the Trainer
Moving a buckle, changing a bit, adding a pad, or rewrapping a leg can affect comfort and control. Ask the responsible professional and learn the reason for the existing setup.
Ignoring Care Instructions
Excessive heat, aggressive cleaners, oversaturation, and unsuitable oils can damage equipment. Follow the specific manufacturer’s instructions because materials and finishes differ.
Build Your Polo Kit at Horse Riding Store
Start with fit and function, then compare products. Browse our riding helmets, riding and polo boots, polo mallets, and saddles. Product availability, specifications, and rule acceptance can change, so contact Horse Riding Store when you need a measurement or material confirmed before ordering.
If you are unsure where to begin, buy the best-fitting approved personal safety equipment you can reasonably maintain, borrow mallets until your mounted requirements are clear, and leave pony-specific tack to the club or horse professional. That sequence protects both budget and decision quality.
Frequently Asked Questions About Polo Equipment
What equipment is essential for a first polo lesson?
You need a correctly fitted approved helmet, suitable boots, fitted trousers, and any additional protection required by the club. The club will usually provide the polo pony, tack, and mallet, but confirm this when booking. Some clubs also lend helmets and knee guards in limited sizes.
Do beginners need to buy a polo mallet?
No. Borrowing is preferable at first because mallet length and feel depend on the player, pony, saddle setup, and technique. Buy after testing adjacent lengths under coaching.
Can I use a bicycle helmet for polo?
No. Use a helmet designed and certified for the applicable equestrian or polo requirement. A bicycle helmet is designed and tested for a different activity and does not become suitable because it fits your head.
Are knee guards compulsory in polo?
Requirements vary by association, competition, club, and age group. Knee protection is a standard part of the player checklist for mounted polo, but you should verify the current wording that governs your session or event.
What boots should I wear for polo?
Use polo boots or riding boots accepted by the club, with an appropriate heel and safe stirrup compatibility. The boot must fit securely and remain comfortable in a mounted position. Ask the instructor before buying a style for regular play.
How much does a complete polo kit cost?
There is no stable universal total because certification, materials, custom options, country, and whether the club lends gear all change the cost. Budget in stages: helmet and boots first, gloves and knee guards next, then a tested mallet. Do not include pony tack unless you are responsible for a known horse.
Do I need my own polo pony and tack?
Not for introductory polo at a club that provides lesson ponies. The horse and fitted tack are normally supplied as part of the session. Leasing or ownership comes later and requires professional horse, tack, welfare, and cost assessment.
How often should polo equipment be inspected?
Perform a brief check before every ride and clean and inspect after use. Conduct a more deliberate recurring inspection of stitching, straps, buckles, impact surfaces, shafts, heads, soles, and protective components. Follow manufacturer intervals and replace anything damaged or of uncertain safety.